Request Your Free Quote!

Opening to the Patio: A Huntington Beach Family Room Reset
A Huntington Beach family room rebuild after a 12-foot back wall came out for a 4-panel multi-slide patio door. Header patch, level-5 finish, knockdown match.
The Starting Room and What They Wanted
The house sits one block off Goldenwest in Huntington Beach. A 1972 single-story, 1,940 square feet, with a back family room that opened to a covered patio through a tired 6-foot sliding glass door and two flanking fixed panels. The wall was load-bearing. The ceiling carried a 14-inch bulkhead across the slider that bumped the ceiling line down to 7-foot-8.
The owners wanted the back wall gone. Not the whole wall. The 12-foot section between the family room and the covered patio. They wanted a 4-panel multi-slide door so the family room and the patio read as one room in summer. They also wanted the ceiling line flat across the new opening, no bulkhead, no soffit.
That meant three trades on top of ours: a structural engineer to size the new header, a framer to set it, and the door installer. Our job was everything that came after. The drywall sequencing had to slot in cleanly between the framer’s final pass and the trim carpenter’s first day, because the door installer needed mud-free reveals to set the new track.
The Wall Came Out and the Drywall Reset Began
Permit pulled at the Huntington Beach building department. The engineer specified a 6-by-14 LVL header with two trimmer studs on each end. Demo took a day and a half. The drywall on both sides of the wall came off cleanly, and the bulkhead got cut back to the new beam.
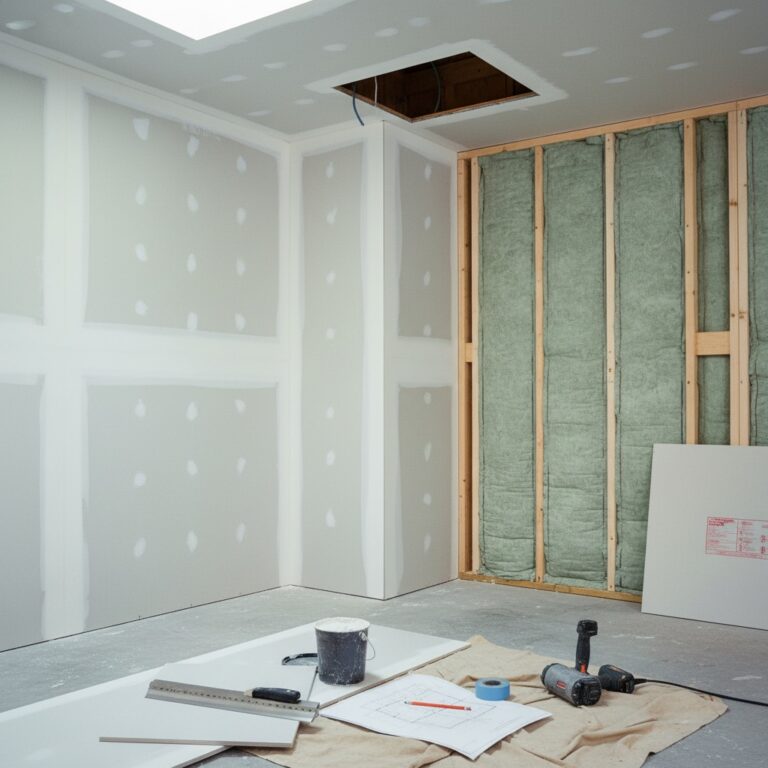
After the framer set the header and the door installer landed the multi-slide track, the room looked like a half-finished movie set. Exposed studs above the door, raw beam, plaster dust on every surface, painter’s tape marking what stayed. The original drywall around the opening had three areas of damage worth flagging: a hairline ceiling crack tracking from the old bulkhead corner, two paint-buildup ridges where the slider trim used to sit, and a small section of texture mismatch near the return wall to the kitchen.
We hung 5/8-inch rock on the new framing around the beam. The bulkhead removal left a 14-inch by 12-foot section of ceiling that needed to match the rest of the room. New rock there too, screwed off to the joists, with backing added at one joint where the framing was a little wide.
Behind the original drywall on the kitchen-side return, the framer flagged one stud that had been notched too deep for an old cable run. That was a 20-minute sister-stud fix before we hung. Easy to catch with the wall open, expensive to find after taping. That kind of thing is the value of having the drywall crew on site during the framing reset rather than scheduled cold for the following week.
Finish Choices Built for Long Light
The family room faces west. June afternoons throw raking light across the back wall from 3pm until the sun drops behind the covered patio roof. That kind of light reads every flaw. The owners had been living with light orange peel on the walls and a thin knockdown on the ceiling, and both finishes had been touched up over the years with patches that no longer matched.
We talked through three options at the kitchen table. Match the existing orange peel on the new sections and call it a day. Skim the whole back wall to level-5 and leave the ceiling matched in knockdown. Or take the entire family room to level-5 walls and a new flat ceiling with light texture. The cost spread between the cheapest and the most expensive option was roughly $2,800.
They picked the middle. Level-5 on the back wall, knockdown match on the ceiling, original orange peel on the side walls where light hits flatter. That kept the budget in check and put the level-5 where the long summer light would actually flatter it.
Level-5 means a full skim coat across the entire surface, not just feathered patches. Three tight passes with a 14-inch knife, sanded between coats. The ceiling knockdown took two practice boards in the garage to dial in the splatter pattern that matched the rest of the room. Texture matching is the part of the job that costs you on the back end if you skip the practice boards.
Patio Side, Dust Control, and Summer-Break Reality
Two kids home for summer break. A golden retriever. The owners did not want the family room sealed off for three weeks. We staged the work in two zones. The patio-side opening got plastic from floor to beam during demo and the rock hang, so dust stayed in the work zone. A second plastic wall went up at the hallway entrance to keep the rest of the house clean.
Sanding got moved to early morning hours, 7am to 10am, before the kids were really up and before the marine layer burned off. Cleanup happened twice a day. The compressor and the texture sprayer ran outside on the patio side, with extension cords routed through the new opening before the door was glazed.
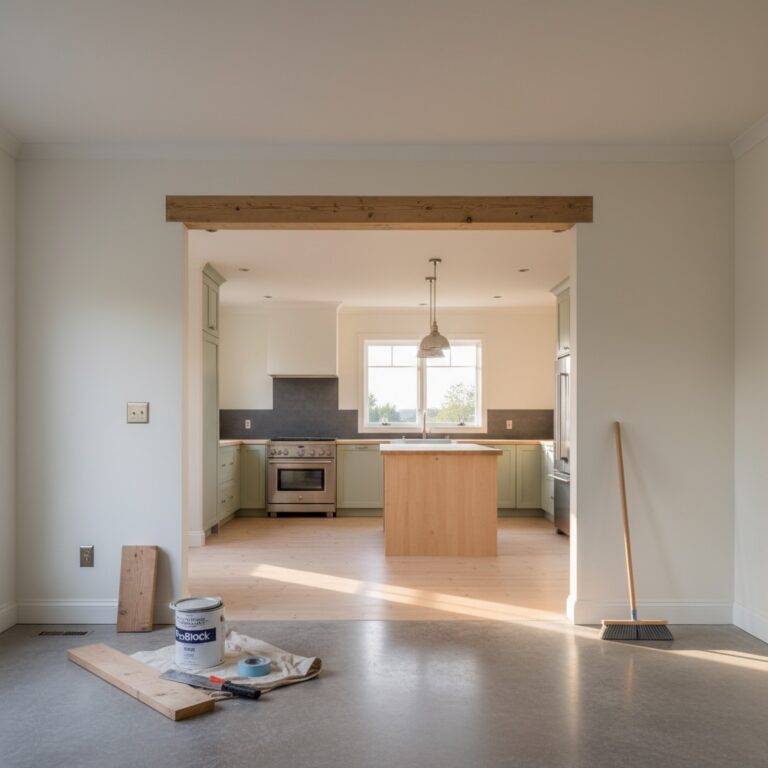
The covered patio itself got a fresh coat of paint on its existing stucco ceiling. The owners had not planned that, but with the multi-slide open the patio ceiling now reads as part of the family-room ceiling sight line. We matched the family-room ceiling white to the patio so the eye moves across the opening without catching a color shift. That was a 4-hour add-on, not a separate quote.
The Final Walk and What It Ran
Twelve working days from demo to final walk. Day 1 demo, days 2-3 framing and door install (other trades), days 4-5 drywall hang, days 6-9 taping and three coats of mud, day 10 sanding and texture, day 11 prime and paint, day 12 punch list and final clean. The owners hosted a Father’s Day backyard dinner three days after the final walk.
Drywall scope on this project ran in the $7,200 to $9,400 range typical for Orange County right now: a 12-foot opening reset with header patch, a 14-by-12 ceiling patch with knockdown match, level-5 skim on a 12-by-9 back wall, two-coat prime and finish paint on the worked surfaces, dust control through occupied space, and full haul-off. That excludes the structural engineer, the LVL header, the framing labor, and the door package, which the owners contracted directly.
If you are thinking about opening a back wall to a covered patio before the rest of summer disappears, we run free in-home assessments across Orange County. Bring the questions. We will walk the room, talk through finish levels, and put a real number on paper before we leave.
Morning-context sources used: Mercury Builders CA, Outdoor Living and Landscape Transformation 2026 (https://www.mercurybuildersca.com/outdoor-living-transformation/); HomeGuide, Sliding Glass Patio Door Costs 2026 (https://homeguide.com/costs/sliding-glass-doors-prices); C&S Demolition, Load-Bearing Wall Removal Guide and Cost in SoCal (https://cnsdemo.com/blog/wall-removal-load-bearing-guide); Remade Home Construction, Top 10 Home Remodel Trends for 2026 Southern California (https://www.remadehomeconstruction.com/top-10-home-remodel-trends-for-2026/); Jackson Design and Remodeling, 2026 Design and Remodeling Trends in San Diego (https://www.jacksondesignandremodeling.com/design-trends/2026-design-remodeling-trends-san-diego/).